Preparations
Before issuing a record of employment, make sure you have completed the following steps:
-
Terminate the employee within the system.
- Process their final payment including any vacation, severance and pay in lieu payments.
If you process the final payment in two separate payrolls, you will need to reconcile the record of employment and manually adjust the first pay period (PP1), unless the pay periods from and to dates of the two payrolls are the same. For detailed instructions on how to reconcile your payment records and verify the accuracy of the figures, please refer to the "Reconcile and Adjust Pay Period One".
How to access the ROE
To access the ROE, open People > Employees. Choose the employee you want to issue an ROE for and open their profile.
There are 2 different ways you can access the Employee ROE screen:
- When you remove an employee from payroll, the system will prompt you to issue an ROE. Refer to this guide for dismissing an employee in Knit.
- Inside the Employee's profile, navigate to Documents > Record of Employment > Create New ROE.
(Note: You can create an ROE for an employee without dismissing them.)
Completing the ROE
When you create an ROE for your employee, the ROE screen will populate most of the required fields in the Company & Employee Information sections.
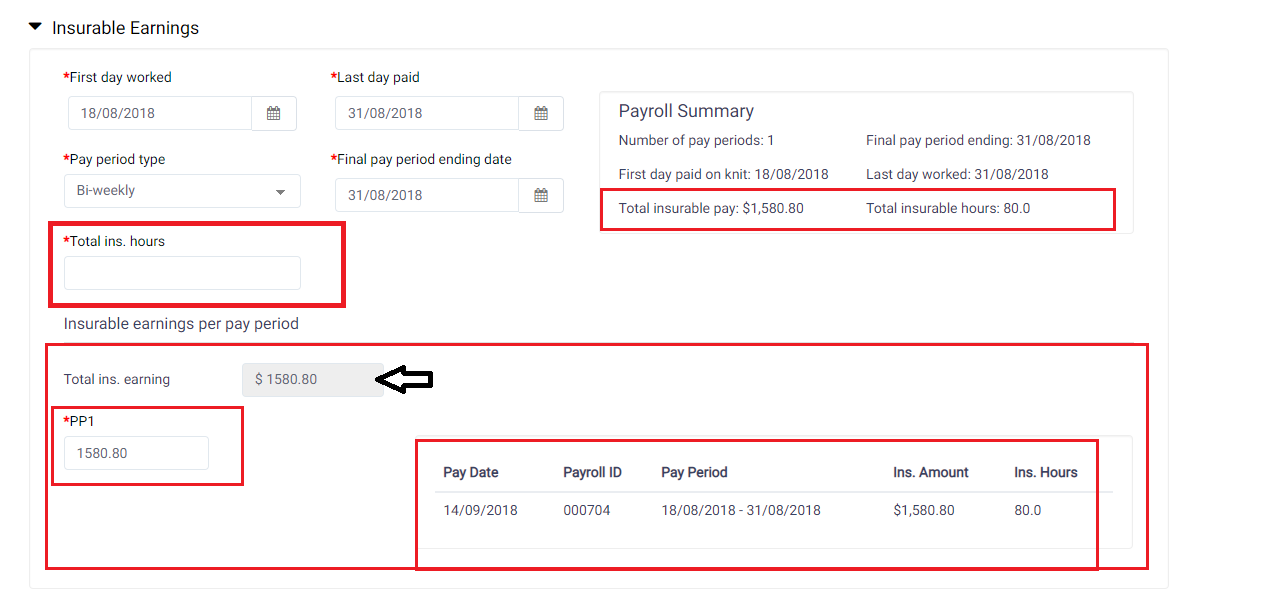
In the Insurable Earnings section, a payroll summary will be available on the right-hand side, which can be used to fill out the Pay Period fields on the left-hand side.
The "Total ins. hours" field must be manually entered. The grayed-out "Total ins. earning" box will auto-fill once the Pay Period fields have been entered.
Complete any remaining sections of the ROE, including any vacation pay and separation payments. For more information on vacation pay and separation payments, click here.
After entering all the necessary information, choose either "Save & Review" or "Save Draft" to allow for completion at a later time. Opting for "Save & Review" will lead you to the "Review ROE" page. Take the time to carefully review the ROE and ensure the accuracy of the details. If any adjustments are required, select "Return to Edit." However, if all the information is accurate and you're ready to confirm the ROE, proceed by selecting "Confirm."

Filing the ROE
With Knit, you have the option to request our team to file the ROE on your company's behalf or download the .BLK file and independently submit the ROE to Service Canada through ROE Web.
To File with Knit:
- Navigate to the employee's profile and go to the "Documents" tab.
- Select "Record of Employment" and locate the confirmed ROE, then click "View."
- Within the opened ROE, choose the "File with Knit" option*.
(Note: If you do not click on "File with Knit," Knit will not proceed with filing on your behalf.)
Upon completing the filing process, you will receive a confirmation message indicating that your ROE has been successfully filed.
ROE Web Access
Please note that if Knit does not have access to your company's ROE Web account, our team will proceed to initiate a request for access. However, please remember that this process can only be undertaken once we have received a signed ROE addendum that grants us the authorization to file on your behalf.
To expedite resolution and minimize potential delays in your employee's waiting time, we strongly recommend considering the option of independently filing the ROE. This proactive approach can effectively mitigate potential setbacks.
Filing Your ROE Independently
Alternatively, if you wish to expedite the waiting time for your employee, you can opt to download the .BLK file and personally file the ROE via your CRA ROE Web access account. To obtain the .BLK file for the ROE:
- Go to the employee's profile and access the "Documents" tab.
- Choose "Record of Employment" and locate the confirmed ROE; then click on "View."
- Once the ROE is open, select "Export to .BLK," and the file will be downloaded.
For further guidance on the process, please refer to Service Canada's ROE Web Access Guide by visiting this link.
Note: Employers filing electronic ROEs are exempt from printing a paper copy for the employee. Additionally, employees who have registered with the My Service Canada Account online service through Service Canada can both view and print copies of their electronic ROEs. Furthermore, employees can easily locate a copy of their ROE within the "Documents" tab of their employee profile.